Raising chickens can be a fun and educational experience. While it does not take a lot of formal education to raise chickens you should have some basic knowledgeable about them. Full grown chickens are fairly easy to maintain. Outdoor or free range chickens usually the spend most of their time running around, getting exercise, playing and picking at the ground looking for food. In the evenings they go back into their chicken coop and rest for the night. They are very simple to care for. Raising chickens is similar to caring for a house birds.
Chickens raised indoors or commercially don’t have as much flexibility or freedom. They are usually confined to smaller areas for egg production and eat on schedules in specified areas. One thing both types of chickens have in common is where they lay eggs. Both are provided nesting boxes to lay their eggs. Eggs can be laid daily, sometimes a few times a day. So it is best to check the nesting boxes for eggs on a regular basis. This is important if you have a large quantity of hens around.
Most eggs that are collected are usually for consumption. It is best to collect those as soon as possible. If left in the nesting box too long, the egg shells can weaken or get damaged. Sometimes a hen will decide to sit on her eggs and try to hatch them herself. Extreme weather changes can also affect the egg as well. Eggs can freeze and crack. Heated eggs can cause bacteria to grow and spoil an egg. To ensure your eggs are fresh it is important to collect them as soon as possible and store them at a proper temperature.
Storing Eggs
Choosing to hatch your own eggs and raise chicks requires a bit more knowledge than raising a full grown chicken. One area of importance is in timing. Keeping track of timing is very important depending on what you want to do with the egg. It is vital to know when eggs are laid. If eggs will be for consumption, you can safely store them a way for a few weeks up to several months and they will still be fine for eating.
Stored eggs should be marked on a calendar so you can keep track of how fresh they will be. One key tip to keeping eggs fresher longer is to not wash them until ready for use. There is an outer layer coating that helps eggs stay intact longer and maintain freshness. If that coating is washed off, then it reduces the usage of time of the egg completely. Egg shells are best when they are hard. A softened egg shell is an indication of a bad egg that must be discarded.
Egg Selection
The first step to hatching eggs is the selection process. An egg can hatch in as little as 21 days. This may be offset by a day or two if the temperature and humidity are off. An egg should be set and ready for incubation within a week after it has been laid. So it is best to begin selection as soon as you can. Eggs that will be incubated should be clean, even shaped and undamaged or cracked. These eggs should not be stored for too long prior to being incubated. The incubation process should be done during the week an egg is laid to ensure hatchability. Otherwise the longer an egg is stored, it reduces the hatchability considerably especially after a 10 day period after being laid. For first time incubation hatchers, start with a few eggs. Once you get the process perfected you can increase the egg count.
This peal and stick calendar is great for tracking down dates when incubating eggs. It comes with a dry erase surface. So if you need to make changes to your notes you can do them easily without having to scratch out dates and find another space to write in. This calendar can be wiped clean and reused multiple times. The boxes are large enough to write detailed notes about your eggs and hatching times. Always be sure to keep track of everything with a calendar or other note pad. It is vital to note down when the eggs were laid, selected and placed in the incubator. Even noting down times when the eggs were turned are important.
Incubation Preparation
Before you can begin incubation it is vital to be fully prepared with the right equipment. While a hen just needs to sit on her nest of eggs to incubate them, it is quite a different process doing it manually. If this is the first time you will incubate eggs for hatching there are a few items you will need to purchase first:
- An incubator
- Thermometer
- A hygrometer
- Candler
- Calendar
A calendar should be kept readily available. With this you can mark off and note the dates your eggs were laid, when they were stored, when incubation started and when it is done. All these dates are very important to keep track of. The incubation process lasts about 21 days in whole. You may have to wait a day or two longer if the temperature or humidity is off in any way.
Incubator Tips & Usage
An incubator will be needed for the whole incubation process. This is one of the most important pieces of equipment you will need. There are many different kinds to choose from on the market. Some are very basic and relatively inexpensive. Those are the ones that will require your attention the most. Those types of incubators make everything a manual process such as egg turning. Many will hold different sizes of eggs depending on what kind of bird you have. The more expensive models often come fully loaded. They may include rails and trays that turn your eggs for you automatically. The lighting can vary as well with some models. There are even some with built in fans and thermostats. Of course you can always buy a basic incubator and just add the accessories you need. You should choose the one that fits your needs and budget.
Using an incubator is relatively painless and most are now user friendly. When you first get your incubator turn it on to test the temperature. If you are using one with a built in fan check to make sure the temperature is around 97-99 degrees Fahrenheit. If the incubator does not come with a fan the temperature should be around 101 degrees Fahrenheit. Always check the temperature before putting eggs into the incubator. Having a thermometer on hand is vital to consistently check the temperature of the incubator. Incubators with internal fan kits are best at keeping the temperature constant throughout the incubator box. Otherwise without a fan you may end up some cool pockets of air inside the incubator. You want to keep the temperature as evenly distributed as possible to avoid problems with chick hatching. If the temperature is high but not high enough to kill the embryo, the chick will hatch sooner than normal. If the temperature is too cool, the hatching process will take a few days longer than expected.
Be sure to place the incubator in a location that will be conducive to hatching the eggs. Do no place them near doors or windows. Any exposure to sunlight can change the temperature especially if it is hot outside. You want to place it where it is fairly cool and the air is stable.
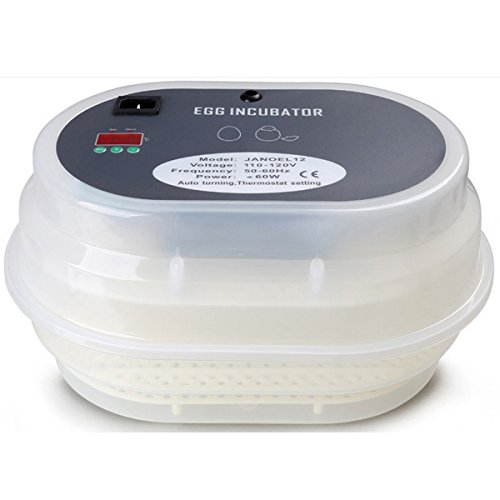
This is a 9-12 Egg Digital Incubator. It features temperature control with an LED screen and automatic turning tray. It can hold eggs of various sizes. It is perfect to use if you are just starting out on incubating chicken. It is very good to use for demonstrations and classes on incubating eggs. It is small enough to place anywhere. It is very easy to clean. This package includes: 1 x Egg Incubator, 1 x Movable Egg Tray with Grille, 1 x Manual, 1 x Egg Candler, 1 and Power Cable, 1 x Manual. There is an alarm for temperature and humidity if they are out of their specified ranges. There is a built in fan that works with temperature control as well. The built-in water channels help to control humidity levels.
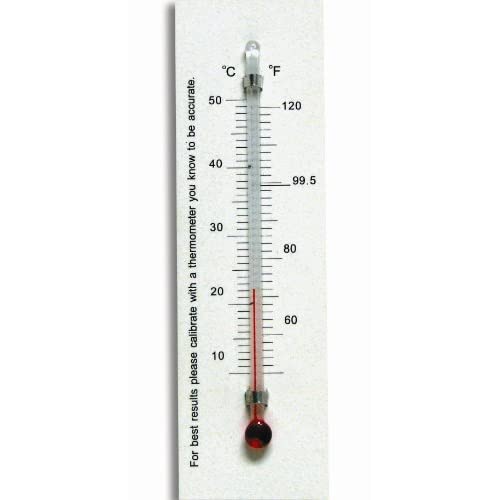
This basic thermometer is great for use with incubators. It is easy to use and read. You can see what the temperature is in Fahrenheit and in Celsius measurements. You don’t need to fuss with any digital controls. Simply place the thermometer in the incubation box and it will begin to work immediately. You can use it as a back up if you are using it in conjunction with a digital hygrometer with thermometer display. You can also use it with a mylar backing and hang it up on a side wall if the incubator is large enough. Otherwise just place it close to the eggs for proper readings.
Humidity During Incubation
A hygrometer is important to have when incubating. It helps with maintaining the humidity of the incubator. This meter can let you know if you need more or less humidity in the incubator. It monitors changes that may occur. This is a humidity measurement tool. Keeping the humidity at a steady level is important to avoid any unnecessary loss of egg moisture. The humidity needs to be no lower than 25%, yet no higher than 60%. The average humidity rate should ideally be 45-50%. Only during the last three days of incubation or the “lock down period” should the humidity be raised to up between 70-80%, no lower than 65%.
Keeping the humidity steady may take some trial and error tricks. Adding small wet sponges into the incubator can increase the humidity in the air if you just need a small percentage of change. One thing to remember is that the humidity may need to be adjusted depending on the type of bird eggs you are hatching. Waterfowl type birds will require a much larger percentage of humidity than a chicken will. So you will have to do research first on what the egg type is before incubating.
After an egg is laid, a small air bubble will form in large end under the egg’s shell. A membrane separating the mass of the egg and the air bubble moves back and forth to relieve stress and pressure on the embryo resulting from changes in temperature. The drier the outside air is, the more fluid is depleted and the faster the bubble grows. Correct humidity in the incubator insures that the bubble does not grow too big, depleting essential fluids, or deny the chick enough air by remaining too small.
The importance of correct humidity is more apparent at the end of incubation. The normal condition is that the air cell has enlarged to the point where the chick can reach his beak through the membrane wall, allowing it to breathe, before it pips through the shell, after which it will “zip” around the shell. If humidity has been excessive, the chick may pip internally into the air cell and drown in excess fluid. On the other hand, if humidity has been too low, the air cell will be oversized and the chick may be “shrink wrapped” in the inner membrane and unable to hatch.
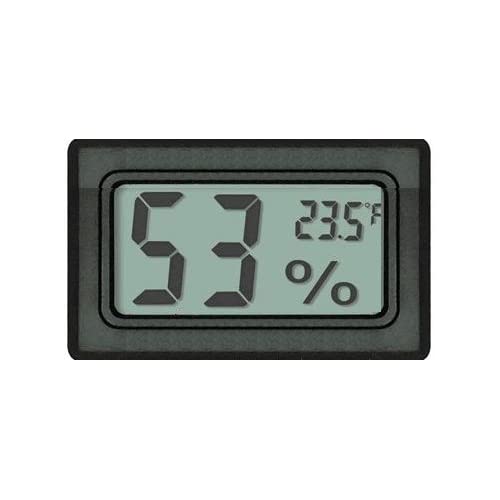
This is a digital Hygrometer. It is perfect for use in incubators, brooders, cigar rooms any other place that requires monitoring of temperature and humidity levels. It has a large display for the humidity levels in the room or box. You will easily be able to read the settings and made adjustments as necessary. It is battery operated for convenience. It also includes a thermometer reader for more results. Simply place it into your incubator next to your eggs for the best results. Be sure to keep it away from fans to get correct readings.
Positioning of Eggs
The next step is setting the eggs into the incubator. This must be done with utmost care. An incubating egg could set into the incubator in the normal position it would sit on a flat surface. The larger end of the egg will sit slightly higher with the smaller end lower down. A similar position it the way an egg sits upright in an egg carton or incubator turner. The fat end of the egg should always be pointing up. An egg that persistently has the small end elevated may cause the embryo to be misoriented with the head toward the small end. In the misoriented position, the chick is likely to drown on pipping liquid inside the egg shell. Therefore, it is quite important that in general, the large end of eggs should be slightly higher than the small ends; or as they would lie naturally on a flat surface.
Turning or Rotating the Eggs
The turning of eggs is very important throughout the incubation process. Eggs should be delicately marked with and X or O. This helps keeps track of when an egg was last turned and in what direction. The turning is essential during the first 14 days of incubation and should be continued until 3 days prior to the eggs expected hatch day. If hand turning, always turn the eggs an uneven number of times a day, so the eggs do not spent two nights in a row in the same position. If not turned to a fresh position frequently during the early stages, the developing embryo touches the shell membrane and sticks to it causing abnormal growth. Turning the egg aids these movements within the egg, and mimics what a mother hen would do naturally.
The turning process of eggs is very delicate. You should wear surgical gloves during the process. If not make sure your hands are completely clean and free of chemicals, oils or dusty powders. Eggs can absorb oils. This will inhibit the hatchability. You need to take extra care during the first week of turning the eggs. The developing embryos have delicate blood vessels that can easily rupture if the egg is mishandled in any way. A minimum of 3 turns a day is required. However for maximum incubation, turn the eggs over 4 to 5 times a day. The only time you don’t need to turn them in the last 3 days of incubation. During that time, the embryos will already be turning into hatching position on their own.
Depending on what kind of incubator you buy, it may come with an egg turner or turner rails. These can automate the turning process for you every few hours. Be sure to get the rails that will work with the type of eggs you have. The rails come in various sizes to accommodate eggs from small to large. If you are using a turner, be sure to remove the eggs from the turner before the last 3 days of incubation. Excessive turning at this stage can be detrimental to the hatching chicks.
Candling
Candling is the process where you can see what is going on inside of the egg during incubation. If an embryo has developed you will be able to see it. This can be done usually 5-7 days after incubation has started. In the days before electricity, candling was done with a candle. A candle light would be placed directly next to the egg to see what was going on inside. This where Candling gets it’s name. Once electric light bulbs became available, this process became more reliable to test for fertile eggs. If by day 10 you don’t see any movement or signs of an embryo, the egg can be discarded as a dud.
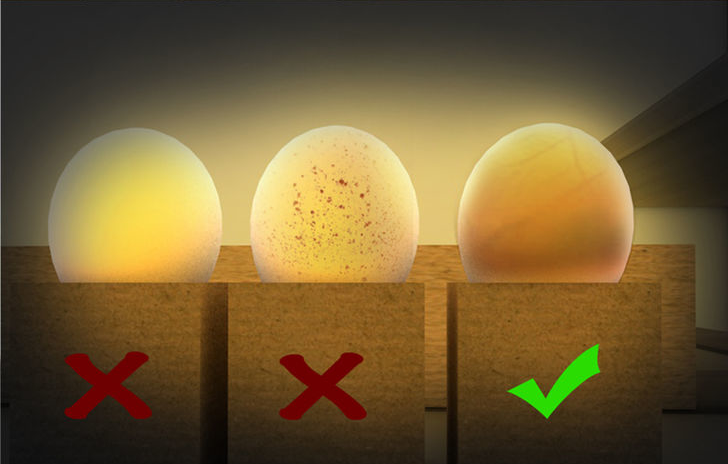
There are two basic ways to check an egg. The first method is to use a Candler. This is a specially designed light for testing eggs. The room you are in should be dark. Next you hold up the egg next to the Candler to see what is happening inside the egg. The Candler is designed so that an egg can fit snuggly on the end of the Candler so that no light emits from the seam between the egg and the Candler. If checking eggs from a chicken you should be able to see signs of life development between 4-5 days after you start the incubation process. Other egg types may be seen with 3-5 days.
The second method is using a candling box for testing eggs. This is done by making a small hole on one side of a box, just big enough for the egg to nestle inside it. Then put a bright light inside the box. Then close up the box. Just be sure not to let the bulb touch anything inside the box to avoid fire hazards. Turn off the lights then place an egg inside the hole you created. You should then be able to see if anything is happening inside the egg at that point. This method is similar to using a Candler if you don’t have one available. However a Candler is a much preferred and safer method to use.
Through either method you should be able to see movement if you are far enough along in the incubation process. In some cases you can see vein development, eye development or other features of the chicks as they grow. Towards the end of the incubation cycle you may not be able to see much of anything anymore as the egg shell darkens.
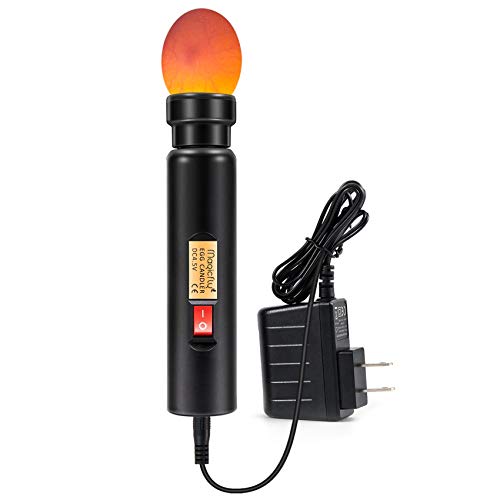
This is a great Candler model to use for first time incubators. It comes with 1 x LED egg Candler , 2 x Candler covers and 1 x adapter. It looks very similar to a basic flashlight. All you need to do is plug in the Candler to a wall socket. This model does not come as battery operated. Then gently place your egg onto the cradle part of the Candler. Then turn on the light. You will be able to see if there are any signs of life going on inside the egg. The eggs should be checked as early as 5 days into the incubation process. If after 2 weeks you don’t see any sort of growth or movement then that is a clear sign you do not have a fertilized egg.
The Last Three Days of Incubation or “Lock Down Period”
These days are the most critical time in the process. There are two important issues to do during these last few days before hatching. First and foremost stop turning the eggs. If you are using an automatic turner, take them out of the turner immediately. Place them on a flat surface. The chicks will be at a point where they will do their own internal movements and getting ready to hatch.
The next step is to increase the humidity level in the incubator. The humidity should be set at 70-80%. This will also help the chicks in the hatching process.
Caring for Chicks after Hatching
Once the chicks are ready, they will start to crack their shells. Eventually you will see them poke out of their shells. This may take a few hours depending on the health of the chick. Once they are fully out, they will need dry themselves off and fluff up. Do not remove them from the incubator immediately. They can stay in the incubator another day or so. They can survive off of the yoke inside the egg that they absorbed during incubation.
After this short period they can be placed in a brooder box. The brooder box must be a nice comfortable temperature for the chicks. It cannot be too hot or too cold. Be sure they have access to water in the box. They can wait for food until day 2 or 3. They must have water though constantly.
Feeding chicks must be done with care. They will require a lot of water and food that must be available at all times as they grow. Check on their food supply constantly to be sure they have enough as they will eat alot and fairly fast. They will require special chick food or starter food as some stores call it. The starter food is specially medicated for chicks. It helps prevent a disease called Coccidiosis. Please note: chicks fed a medicated starter may still get Coccidiosis. The medicine in the feed will only help prevent it.
Chicks are very delicate the first few days to weeks of life. So they may be clumsy especially around food and water receptacles. Chicks can easily fall into water dishes and drown. A common device to prevent drowning is to use a shallow water cup with marbles set in the water over the entire drinking area. The chicks will drink in the spaces between the marbles.
Definition of Products to Buy for Incubation
Calendar – A basic calendar is an important tool to use when incubating eggs. You should begin to use to it note down and mark important dates in the process. The first date to be marked on a calendar is the date the eggs were laid by the hen. From that date you only have a 5 day window to store eggs before they are incubated. The second date to note is when the eggs are selected for incubation and placed in the incubator. From that point is essential to count 21 days from the starting point and mark that date. That date is your expected due date of hatching. Don’t forget to mark down the last three days of the incubation cycle as those are crucial dates for the eggs. You can no longer turn the eggs then and hatching can begin during those days.
Hygrometer – A hygrometer is a necessary tool to use for incubating chickens. It is an appliance that is designed to calculate the amount of humidity in a room, building or incubation box. Hygrometers can provide the accurate levels of relative humidity and absolute humidity. Relative humidity is the percentage of humid moisture in the air. Absolute humidity is the actual amount of moisture in the atmosphere. With egg development it is imperative to keep the humidity at a certain percentage depending on the egg type. Only during the last stages of development can the humidity undergo any major change in numbers.
Thermometer – Like a hygrometer, a thermometer is very important to have around when incubating eggs manually. Before you even put your eggs into the incubator you must be sure the temperature is set correctly for your eggs. The thermometer will keep let you know if it is too hot or too cold in the incubation box. If the temperature is off in any way you must set it accordingly. If it is too hot you can adjust the temperature or use fans to cool the box. Same with cold temperatures, they can be upped a bit for more warmth. If using heat lamps you can adjust the use of them with the use of a thermometer. The temperature cannot be allowed to fluctuate as it affects the egg development and egg hatching.
Candler – The process of candling has been used for years in the process of incubating eggs. In the old days checking and egg was done with a candle. You basically would hold up an egg in a dark room up to a candle light. If you saw movement or development in an egg, then you knew things were going well. With modern development we no longer need to use candles for the candling process. A Candler is very much like a flashlight. Some are made to cradle or hold an egg in place as you check the egg. They have a light on the end of it that can shine against the egg letting you see what is happening inside.
